
Written by Garrett Sammons
Filmmakers shoot interviews constantly, whether it’s for documentary, commercial, or corporate work. As such, an essential part of every filmmaker’s toolkit is understanding how to light people attractively. A good setup can be the difference between a dimly lit subject and one whose features and skin tone are well-balanced. In this blog, we’re going to look at how to light interviews and documentaries.
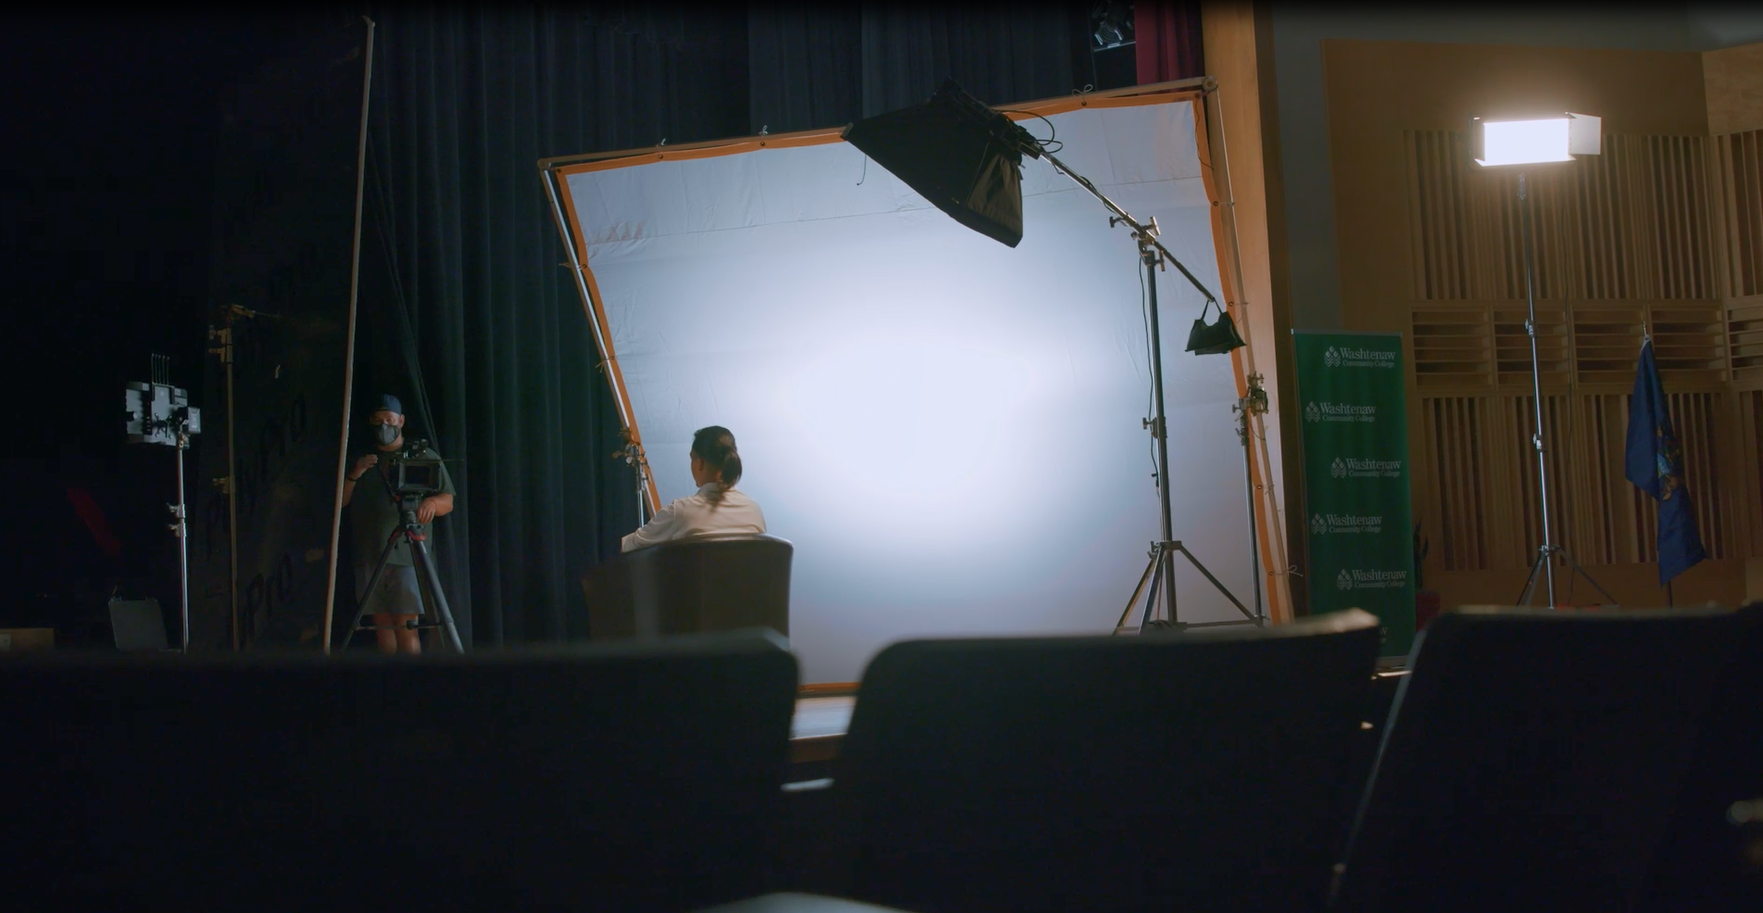
Whether you’re filming an interview or documentary, lighting in a way that services the story is as important as the location of your shoot. For this tutorial, we filmed an interview with a model in a theatre environment to demonstrate the importance of telling your story through lighting.
Choosing the Right Location
One of the first things to consider when filming interviews is how the environment that we’re shooting in affects the story we’re telling. How we set up our lights and cameras is then entirely dependent on the filming location.
At the beginning of your filmmaking career, you’re likely to come across corporate clients who want to cram you into a conference room or another small space. These types of spaces are often too tiny to do any real lighting, which means the location doesn’t serve the story.
So, it’s crucial to make sure that the location you are filming in contributes to the narrative and story you are telling. This makes a location scout a super important part of your filming and production team. Your location scout will go to your intended filming location ahead of time to determine where you want the interview to be set up.
The larger the environment you’re in, the better it will be for your story. A larger environment allows you to add depth and detail to your narrative. So, don’t settle for tiny conference rooms. Lean into finding large environments that service the narrative you’re going for.
The larger environment can be off-site too. A lot of clients will want you to be in their location, but there might be other spaces that make more sense. So, before you even set up a single light, you need to identify the most suitable location for your narrative.
Filming your interviews in a big space also ensures that there’s minimal to zero spill from the subject lights into the background. The more depth we have within our space, the more forgiving our lighting can be from foreground and background.
For this tutorial, our filming location was a theatre stage. However, your location will depend on the profession of your subject and the story you’re hoping to tell with your project.
Using Light to Tell a Story
Once we found the ideal location for our shoot, we then decided on how we would light the set. Now, there are two sets of lights in a theatre environment – stage lights and house lights. And we wanted to lean on that in our lighting setup.
When approaching lighting interviews, your first focus should be on how to set up your background light because it’s not enough to light the subject. For this, we used the Gemini 2×1 Soft fixture. We set it up high with barn doors around it to shape the light. We put the fixture on a combo stand about 15 feet in the air and slightly pointed it down into the seating behind our subject.
We ensured that this was not enough to light the space because we wanted it to feel like the house lights would be dimmed down, whereas the stage lights where our subject is were turned on. We used this lighting to just barely illuminate to give context to our background.
Although lighting for a stage is a slightly extreme example, illuminating your background, even in a corporate environment gives placement to your subject.
I always light the background first when setting up lighting. Setting the background before lighting the foreground allows me to match those contrast ratios accordingly. That way, the background isn’t too blown out in the highlights or shadows. You don’t need to follow the same setup order, but starting with the background adjustments is especially important in environments where you don’t have a lot of control.
Hair Light Setup
The purpose of a hair light, also known as a backlight, is to separate the foreground from the background. This can be done in a couple of ways. For this tutorial, we put a Gemini 1×1 Soft into a softbox. We didn’t put any front diffusion on it, just a 40-degree DoPchoice egg crate on the front of it to eliminate spill from the foreground to the background.
We placed the light up and over from behind the subject and used it as a stage light. We also adjusted the CCT value to be a really warm tungsten-style light and then adjusted the intensity as needed.
Using a super bright light to separate the foreground from the background is a very extreme example of a background light. You generally don’t need that bright of a light. A hair light generally needs to be bright enough to add a bit of a rim across your subject, but not so much that it draws attention to itself.
Everything in our lighting is dictated by the story. For this interview, we wanted the hair light to feel like an intense bright spotlight coming down on the subject as if they were on the stage.
Key Light Setup
Many filmmakers don’t completely understand light behavior when they’re starting. Light behavior refers to the hardness and/or softness of light, which is entirely determined by the relative surface area of the light compared to your subject.
A relatively small surface area of light results in super hard shadows. A much larger surface area, on the other hand, makes things a lot softer. People generally tend to look better in soft light than in hard light. Hence, we need to increase the surface area of the fixtures we’re using to get that light to behave the way we want.
Now, you don’t need a frame as big as the one we used here. But it is important to have large surface areas over the fixtures when we’re lighting people. The key light we used for this setup is the Gemini 1×1 Hard placed on a booming combo overhead and to the side of the subject.
We then blasted the light through a 12×12 butterfly with artificial silk for diffusion. Artificial silk is one of the heavier diffusion materials because it’s a lot thicker. You lose more light with it, but the light is scattered much more beautifully compared to other types of cloth.
We used the LED panel in a dual array for our shoot. You can get a dual array bracket, which allows you to mount two fixtures side-by-side and treat them as a single fixture.
Blasting the lights through the butterfly diffusion frame and placing the fixture approximately 8 feet away from the subject gives a very bright but attractive light. It is still a soft light with a really good wrap, and the fixture is so bright that it also allows us to have catch lights in the eyes.
The 12×12 foldaway frame significantly softened the otherwise very bright 1×1 Hard light, making it easier to get the intensity we wanted without the light getting too harsh and streaky across the face. However, you don’t need to use a modifier as big. We used this one because the theatre stage had a lot more space. So, we could back the light up and still get the behavior we wanted.
The Fill
We used a beadboard, which is a 4×8-foot panel that redirects light. Because the purpose of a fill is to remove unwanted or unattractive shadows, the goal is not to lose contrast. It’s to fill in gaps where there might be something too dark across the face, for example.
Similar to the key light, the surface area matters when setting up the fill light. In our setup, a 4×8-foot beadboard was enough surface area to get a bit less contrast across the subject’s face. Fill light also comes with several bounce options, including ultra-balanced, muslin, beadboard, and white cord. These fixtures all behave differently.
A beadboard helps refract the light in several different directions and works extremely well as a fill. So, we use a fill light, not as a light fixture, but for redirecting the insane amount of light we had coming off of that key. If you’re on a tight budget, you can buy 4×8 insulation panels (poly-board) for $10–$15 from a big box store. This is much cheaper than spending hundreds of dollars on a real beadboard of the same size.
Modifying the lights allowed us to control the spill, adjust the output, change the behavior, or redirect the light.
Onstage Lighting
We had the background light and hair light set to warm tungsten 2700K. We set the key light to daylight, which is 5600K. Then, we white-balanced our footage to that 5600K, which allowed the subject’s skin tone to feel natural and warmed the tungsten lights.
We used a mixed lighting setup here, but you don’t always have to. Let your story dictate whether or not you need fixture control. If you don’t have fixture control, you can then match your lighting to the one that’s already in the space. But all of this is dictated by your story. The story should dictate the location, camera work or camera angles, and the lighting.
Quick Tip
Balancing the background and subject is incredibly important. Every camera has a contrast ratio or dynamic range of what it’s capable of recording. So, working within the limitations of that camera ensures that you find that balance. You can also do that by using false color in a camera to understand the exposure values. If you don’t have false color on your monitors, you could use histograms, waveforms, and zebra stripes. But it’s crucial to work within your camera’s contrast ratio.
This was only a snapshot of our guide to cinematic lighting techniques. You can watch the full tutorial below for a more in-depth shot-by-shot guide to interview and documentary lighting. You can also DM me your questions on Instagram.